SEO Content Writing | Structure Your Blog Post with Perfect WordPress HTML Usage
Categories content structure, SEO Content Writing, Wordpress
After my last (rewritten) article, I thought a post on the structure of SEO content writing in WordPress might be useful. In fact, this applies to all web content, all blog posts and is basic HTML protocol that you should bear in mind while writing anything at all.
No, my site does not validate entirely, but the errors and warnings are mostly because of the AddThis plugin. Can’t be helped. The point is to strike a balance – to follow protocols and yet, have enough functionality. I mean, blogging without social sharing buttons – who does that?!
Image optimization is also a very important part of SEO content writing but that will require a separate article in its own right.
Writing compelling content
Now, this is the first thing that you should be doing. Writing for your audience. The human audience, I mean. And once you’ve done that, you will want to make sure your content is optimized for search engines as well.
This article on writing compelling content that everyone will read at one go could be useful.
And now, let’s deal with the topic at hand.
Content
TinyMCE Advanced plugin
This gives the default editor enhanced capabilities. Download and install or click on Add New plugin in the WordPress dashboard and type “TinyMCE Advanced” in the search box (usually extreme right, top), then click install, and then activate and configure. Everything is pretty intuitive and I’ll not go into details. If you need a visual tutorial, just Google for it. There are many.
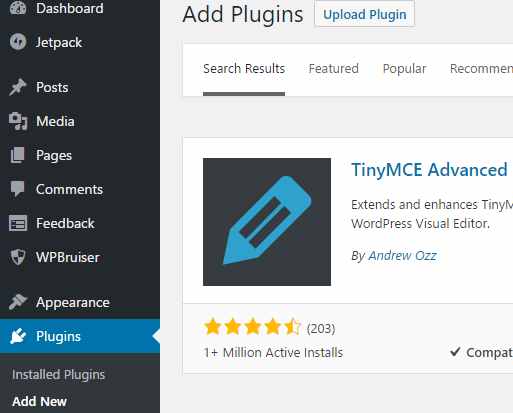
This is the first step: Don’t ignore it if you are looking for proper SEO content writing when creating blog posts in WordPress.
Statutory Warning: It works fine on my blog and has had over a million installs, but plugins act erratically for any number of reasons. Don’t come after me if you face problems after activation: visit the support forums instead.
SEO content writing : basic HTML optimization
Header tags

Header tags ought to come in a hierarchy. Else, the search engines are confused. You don’t want that.
So, <h1> comes before <h2> which comes before <h3> and so on. That’s the basic rule. (Notice the “Preformatted” option after “Heading 6”: We’ll be coming to that right after we’re done with the header tags).
Only ONE h1 Tag
There’s to be only ONE <h1> tag in an article / web page. It shows the search bot the headline – the subject of the article or the page. If you put in more than one <h1> tag, you will end up making the bot very confused as to which one it should choose as the most important <h1> of all, and what your page is really about.
Can you NEVER have more than one h1 tag in a single post?
As a matter of fact, yes, you can. However, there has to be a good reason for more than one <h1> to exist. If you have very distinct sections in the same post, it would be okay to have more than one. Bear in mind, though, it is the search engines that will determine whether you were justified in using them.
Here’s a (summary) transcript of what Matt Cutts says in the video below:
“It is okay to have more than one <h1> tag if you have different sections but this has been abused before and our algorithms take that into account. So, yes, you can have more than one <h1> tag on a page, but you’re probably better off not using them indiscriminately.”
So, how’s this a difficult proposition?
It isn’t, but as always, unexpected weirdness appears out of nowhere and you have to be wary of those.
If you were using regular HTML in a web page, there would be no problem. In WordPress, however, you will be using a theme. Some themes will use <h1> for the site title. Usually, this will be the case only with pages and not posts. If you create a page, and most likely you will, and insert a headline wrapped in <h1> tags, you will inadvertently cause double instances of <h1> to appear on your page.

Most of the time, the site title problem is taken care of once you’ve uploaded a header banner image. But unless you know that something is wrong, you can’t possibly fix it. Meanwhile, it is screwing up your SEO.
The Fix
You can right-click on the web page and select ‘view page source’ in the context menu that pops up. On the page that shows the source code, press Control+F to find the <h1> tags. Don’t type in <h1> because it might have a CSS or span class associated with it.
For example, the theme that I am using at the time of writing this post uses <h1 class= "post-title entry-title"> for the headline to this post. Unless you know what the exact class is you will never find it. Use the closing tag </h1> instead.
If you find multiple <h1> tags, head over to the concerned forum of your chosen theme and ask for a remedy. But in all probability that will be unnecessary. Like I said, the problem is usually sorted out if you replace text with a header banner image. Use the theme’s customizer option to make the necessary changes.
Here’s something that might interest you
I was looking for <h1> tags and found them, only, one of the tags I found came as a surprise. The tags enclosed the following words: ‘My Newsletter’. I had no idea what was going on and took a closer look at the code since those words were not visible at the front end. There they were, in the code in the footer subscription form. I just removed the form. Will get back to it later to fix the code if I can find the time.
So what really happened?
The autoresponder service that I use has options to create forms – as they all do. I normally snip off all the code and retain only the little that is required to render a textarea for email and a submit button.
In this case, I may have been in a hurry, I don’t remember. And the <h1> tags remained. They did not show at the front end but remained buried in the code – visible only too well to the search bots.
I don’t know why anyone would use <h1> tags in a subscription form in the first place but that’s not a problem I can solve. Best learn to live with around it, I suppose.
Regarding ‘validation’ referred to at the beginning of this article…
My home page shows a warning in the validation tool that says:
“Warning: Consider using the h1 element as a top-level heading only”.
This is because I have used a bit of body text first, before using the <h1> tag. I find that perfectly acceptable because my content structure demands it. Again, I could be wrong but at least, I know why I am doing what. You should, too. If you wish to be an SEO Content Writer, by all means, improvise, but know the rules, first.
Hierarchy of tags
We did mention that the header tags come in a descending order, numerically, and that is quite true. However, that does not stop you from beginning with a fresh set of descending tags in the middle of your article if the structure of your content demands it. You can have one section beginning with <h2>, then have a few subheads in <h3> (till <h6> if necessary) and then begin a new section with <h2> and continue with further subheads. And, as we have noted, ordinarily, there’s to be only one <h1> – the one that is in the article headline.
Most of the header tags in this article are in <h3> or <h4> because they come under the <h2> heading “SEO content writing: basic HTML optimization”.
Preformatted text
This is useful when a block of text is arranged in a pattern as poetry, often, is. If you wish to preserve the pattern, you select the text and click the “Preformatted” option ( as noted in the image earlier). Here’s an example via marketing zen – the limerick is in <pre> tags and the entire thing, right from the author’s name to the end of the limerick, is in blockquotes.
Tamar Weinberg, Mashable
SEO is a great little tool
You can get found online - it's cool.
 Once you are ranked
 You money is banked
And your competitors will come out being fools.
And if you should find it difficult to add a line of text such as this one after a blockquote, it is because WordPress has its quirks. If you write everything first and then format a portion of it as blockquote, there’s no problem. You still have paragraph text below it and you don’t notice the annoyance.
If you format as you write, blockquote a bunch of text and press Enter to start a normal paragraph, you may find it difficult to escape the blockquote tag!
Don’t sweat it. Switch to Text view, locate your blockquoted section, type something below it after the </blockquote> tag, return to Visual and you will find your typed ‘something’ in paragraph format. Now select and overwrite it with whatever you really wanted to write.
Of course, there’s the simpler option of simply selecting the new text you’re trying to add as paragraph and clicking on the paragraph option from the visual editor 🙂
Using Blockquotes
Ordinarily, I wouldn’t even think about writing anything on blockquotes because their use is self-evident. But while (re)writing the last article, I noticed that this particular author had put all the subheads in blockquotes!
There’s some evidence that putting things that are of particular importance to the central idea of your content (even if they are your own thoughts) can actually help. Search engines may treat them like meta descriptions and this could be good for your ranking as well. Exploring this rare use of one of the very common elements of HTML makes sense if your content is otherwise appealing, and optimized for search bots. Note the following snippet:

However, putting entire subpoints that amount to at least one-third of your content is not something I’ve ever come across.
The blockquote element ( <blockquote></blockquote> ) was introduced in HTML 4.01 in 1999. When using material from other sources (with attribution, of course) to give credence to your own thoughts, use blockquote to avoid duplicate content penalty.
The general rule is, put everything that you are quoting into blockquotes.
Let’s put that in blockquotes:
The general rule is, put everything that you are quoting into blockquotes.

Select the text you want to put inside blockquote and click the blockquote icon in the WordPress editor (see image above).
And, according to APA style guide, only if the quoted portion is 40 words or more.
For any quote with fewer words, just use double inverted commas in the usual manner. You can italicize the text if you wish.
In practice, I do not exactly follow the APA guidelines (because I am mostly writing blog posts, not academic or journalistic content). I just blockquote whatever I need to blockquote, click on preview and see if it is looking good. If it does, it stays, if it looks forced (a single sentence would), it goes inline with double inverted commas.
By the way, you never use inverted commas with blockquotes.
What happens if you use blockquote on your original content?
Indeed, what if we choose to play around with the formatting and do whatever we like? Well, if you don’t care for SEO, you can do whatever you like. The search engines will index a large amount of text on your site as quotations and set them aside from what they see as original content.
So, for example, if you have a 1000 word article with 400 words in blockquote, the search bots will see only 600 word worth of original content. With the current trend of writing comprehensive posts, and content that provides value, your perceived 600-word article could fall pitifully short of Google’s expectations.
Additionally, people who come to your site, particularly ones that are familiar with the most basic rules of formatting, will find the look of your content amateurish. So, even if you have provided valuable insights, you could end up not being taken seriously.
There’s something called class that money can’t buy. This is similar. If you don’t follow etiquette, you are looked down upon. If you are into SEO content writing but don’t know how to format your articles, you are dismissed as an amateur. There’s no two ways about it.
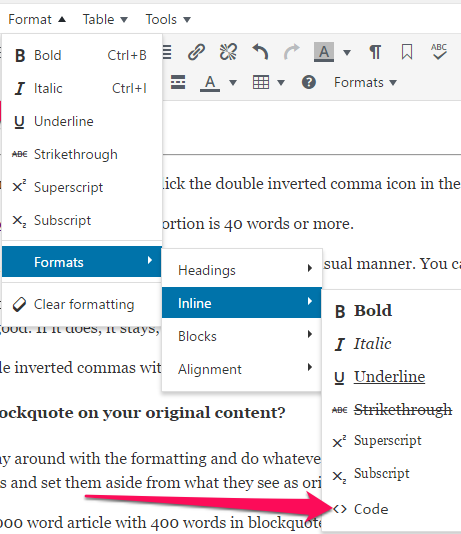
Incidentally, I have used the proper formatting for code ( <code></code> ) when referring to code – as in <h1> because code is supposed to be displayed as such in the front end of the web page. Everything in its place is proper SEO. And every little bit helps you rank.
(That said, it is also acceptable to write H1 or H2. I took the extra trouble because this post is about doing things right).
In TinyMCE Advanced, you find this in Format > Formats > Inline > <> Code.
Disclaimer:
I cannot cite a source that specifically says you cannot put large chunks of your own content into blockquotes. And that’s probably because it is beyond weird to do so and the topic hasn’t ever come up for discussion. I did actually make several Google searches for it – please leave a comment if you happen to find anything relevant.
Use of <hr /> tag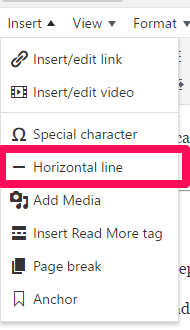
That would be the horizontal line that separates one block of content from another within the same article. The point here is ‘thematic’ break.
Do not use it before or after headlines unless there is a very good reason to do so.
In the present article, you’ll notice that the headline “SEO content writing: basic HTML optimization” is presented with <hr /> tags before and after. I had to make a decision to either use CSS to create two lines or to use the <hr /> element since, thematically, the headline is the parent element of so many different subheadings that come after it. CSS would have taken a little more time than simply inserting <hr /> tags and I’m perpetually running short of time.
Apart from the example just cited, I use it to separate images from text.
Web readers will skim through most things. In addition to creating SEO friendly content, you have to provide them with the maximum visual comfort to get them to actually read. The <hr /> tag is very useful in that respect. Don’t use it indiscriminately or your content will look disjointed instead of properly segmented.
Using tables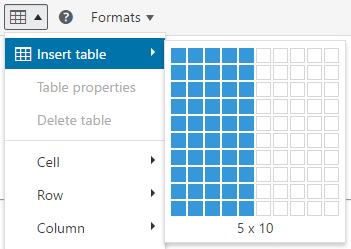
Again, if you want to maintain proper form (and you should), put data in tables. Because the search bots know that data is for tables. You put data in any other format, they may not understand it’s data. In any case, you are not likely to figure in Google Featured Snippet.
You can use the default table option or head over to this site to generate HTML for a table. Pasting from MS Word doesn’t work. You can, however, use a Cloudup account to embed tables from MS Excel or Google Docs. Here’s a detailed post on how to do that.
The main reason you may not want to use the default WordPress table is that the columns cannot be marked in vertical lines.
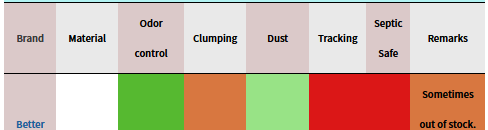
Consequently, you will have to use colors or shades to make individual columns stand out and you may not always want to take the trouble.
So, product comparisons use tables.
Points about a certain subject use bullets ( which create lists).
Using bullets
Bullets represent the list element ( <ul>, <ol> and <li> – unordered and ordered lists ). If you are listing, use bullets.
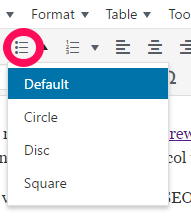
The same rule applies if you are creating a content list at the beginning of the article (Wikipedia style, which is very good for SEO, by the way).

Using Anchors
Notice that the list elements are hyperlinked to sections within the page. Use the anchor tool for that. This is very convenient for the reader. Remember to keep the occasional ‘Back to Table of Content‘ of ‘Back to Top‘ link as well, using anchors, again. This may not be directly related to SEO content writing but it does help you look professional.
Let’s play with blockquotes again since what comes next is something you will find very useful.
If you insert an anchor at the exact position you want your readers to reach, upon clicking the relevant link, they may actually reach a little below the desired location. This is how browsers seem to render. The workaround is to insert the anchor tag a little higher than the target location in the text.
So, the anchor tag for ‘Bullets’ is actually inserted right before the line in the preceding point that says, “Statistics use tables.”
Anchors are represented in HTML as <a name="anchorname"></a> or <a id="anchorname"></a> . WordPress uses the second format.
Inserting the anchor tag and linking to it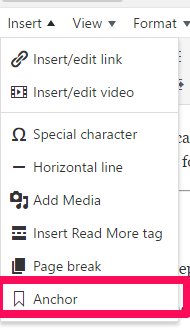
First, click in the text where you want to insert the anchor. Next, click on the anchor icon (you can customize the editor to let it appear on its own) or, Insert > Anchor.
Once you click on Anchor in the drop-down, you will be presented with a dialogue box. Type whatever name you have chosen for the anchor, but keep it relevant. Again, unless you are using humor effectively, it is best to use names that make sense.
When your anchor is inserted, go to the line of text (or word, whatever) you want to link to it, select it, click the link icon in the editor, type in the anchor name with hashtag right before it without space. So: #anchorname.
Treat anchors like URLs. Don’t use redundant space in the name. Better still, see them as hashtags that are so common in social media. Create a hashtag with no space anywhere in it.
The Read More tag and Home page selection
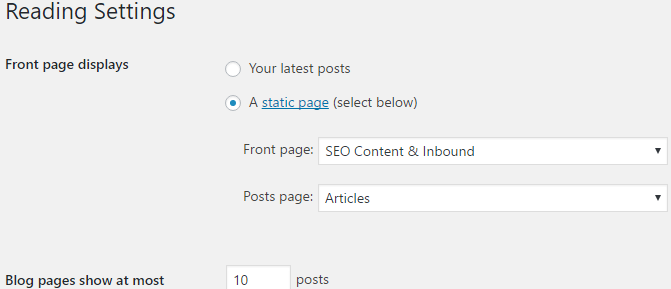
All your posts in WordPress are listed with link (in the headlines and featured images) to their original location in a single page. You can call the page whatever you like. Frequently, it is the Home page of your blog. If you maintain a static Home page, you will want to create a separate page for your posts. You can do the needful from the WordPress Dashboard by going to Settings > Reading.
All you need is to create the page from the ‘Add new’ option (Pages > All pages / Add new) in the WordPress admin / Dashboard sidebar. That page will contain only the page title. Once you’ve created the page, it will appear among the options for Posts page (see image below). You can choose to disable social sharing buttons on this page.
In case you’re wondering why my site navigation shows ‘Blog’ instead of ‘Articles’ as seen in the image below, I made that change while creating the menu (Appearance > Menu) also reachable via WordPress Dashboard sidebar.
If you click on Blog, the URL will still show /articles/ and not /blog/.
Which is the better option in SEO content writing?
Most experts would say a static page with optimized content that relates perfectly to what your blog is about is the perfect choice. And I see no reason to disagree.
Your home page link is what will be referred to most frequently by people when they talk about your blog. It is your home page that you will register at forums when you wish to set your website details. Yes, you can do that with a specific post’s URL you want to promote, but a strict moderator might flag that as a deliberate attempt to get a backlink. Same thing with blog comments.
Besides, it makes sense to strengthen the domain (or subdirectory, in my case) name of your blog if you wish to create a strong branding.
Using the Read More tag
 Whichever option you choose, all your posts will be displayed in a single page. You can choose to display all the articles in their entirety one after another chronologically with the latest at the top. The reader will have to scroll down to view (and read) each article.
Or, you can choose to display snippets along with the headline and the Featured Image (if any) so that your reader has a list of your posts to choose from. They can click a post’s headline / featured image to go the individual post.
If this is what you wish to do, you will need to insert the <!--more--> tag where you want the snippet to end. In this article, the first paragraph is displayed as a snippet in the Blog page.
If you have a static page for Home page and another for your posts, remember to display the posts page in your navigation. Else, all your readers will ever find on your blog is the list from the ‘Recent articles’ widget on the sidebar (assuming you have a sidebar and have chosen to display the widget).
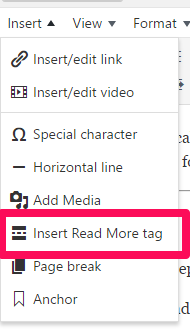
To insert the <!--more--> tag, click where in the content you want it to be inserted, then choose Insert > Insert Read More tag or click the “Read More” icon in the editor if you’ve placed it there.
Other Elements
The <div> tag is used to separate a section and apply to it its own, special formatting. Say, you want a box of text to appear in yellow to separate it from the rest of the content. Perhaps, you wish to showcase an offer in it. In such cases, the entire section needs to be wrapped in <div></div> tags and then you apply the necessary CSS rules. But that is another subject, entirely.
The Page break option is to create separate pages in the same content. This is not ordinarily encouraged for several reasons. Again, a subject in its own right.
Concluding words
There is much to more to the TinyMCE Advanced editor than what we have discussed. And there’s certainly a whole lot more to WordPress SEO. Our purpose, here, was only to talk about how to follow proper HTML protocols when SEO content writing to make the search engines happy. Yes, it takes a bit of work but after a while, it also becomes routine.
Do leave a comment if you think I left something out.
Thank you – that was a fascinating article. I love seeing on page SEO basics layer out in an easy to understand format! well done 🙂
Thank you for the kind words, Michelle 🙂
I enjoyed the way you broke down everything very simple for the average user to understand. I love TinyMCE and have been using it for awhile. In fact, it’s one of the plugins I mention in a SkillShare class I created called “Two Must-Have WordPress Editor plugins.” And I learned something new! I didn’t know that using a TOC with anchors at the beginning of your post would up your SEO ranking. Thanks for that!
Glad you found the post useful, Darlene 🙂
I should have elaborated on that table of content point, perhaps, but the post had gotten so long that I was a little tired at that point :p
First, the anchors act as internal links into a considerably long post. That means there is less chance of search engines not crawling deep into the post. So indexing is better.
Second, Google may display the ‘Jump to’ option when they display your post on SERP – that sort of enhances your credibility and CTR
And third, it is possible (I can’t be certain) that you may find yourself in Google’s Featured snippet.
Also, if you create a post that is easy to navigate, your readers will benefit and time on site will increase (because they will read more of your post, hopefully, without skimming and clicking away) and that should enhance your rankings as well.